|
How to Tie the Constrictor Knot
Basic assembly of a speargun or polespear band consists of two basic steps. The wishbone is inserted into end of the rubber band tubing. The tubing is then constricted to stop the wishbone terminal from pulling out.
Many mass produced guns use rigid plastic or metal rings for the purpose of constriction. The upside for the manufacturer is that with specialized tools, installing rings is a speedy, low skill task. The downside of rings is that they require the use of big honking wishbone terminals that shorten the life of the band. You have probably noticed that most bands fail right over the terminal and the bigger the terminal the sooner they fail. Of course this downside is on the customer's dime.
A well tied constrictor knot on the other hand, constricts the rubber tubing to a smaller diameter and therefore allows for the use of smaller, rubber-friendly, terminals. Of course not every speargun manufacturer uses rings, in fact the higher the quality and the price of a speargun, the more likely it is to come with hand tied bands.
When we started tying bands we used the old school waxed nylon lacing cord as constrictor, like everyone else. It worked okay if you didn't mind tying a pile of knots and melting the ends of the cord to limit knot creep. The main problem with Nylon as a constrictor is its stretchiness. Obviously stretchiness is a bad thing given the extreme force the constrictor is under when a band is loaded. Nylon does not have the best knot retention to start with and lubricating it with wax doesn't help. So you might be asking, why the wax in the first place? The answer is that without the lubrication, the force necessary to tighten the constrictor knot could exceed the tensile strength of the Nylon lacing cord.
You are probably sensing that we are not big fans of Nylon constrictor, but our main objective is to give you the back story before we sing the many praises of Spearit Kevlar® constrictor. Our crowning of Kevlar® as the ultimate constrictor is based on the combination of three qualities. A combination not found in any other synthetic or natural fiber.
- Tensile Strength - On a volume and weight basis Kevlar's tensile strength is near or at the top of the charts. It is three times stronger than Nylon of the same size and construction.
- Extremely High Modulus - Modulus is the force required to elongate a material. In other words high modulus means low stretchiness. As we have already covered, low stretchiness equals high marks for a constrictor.
- Relatively High Coefficient of Friction - Relative to other synthetic super fibers that are strong and low stretch like Spectra® for instance, Kevlar® has a higher coefficient of friction. Simply put that means that Kevlar® it is less slippery than its super rivals. Less slippery means better knot retention, which for a constrictor is very important for obvious reasons.
Now that you are well informed about the, "Why?", let's get down to the "How?". At a minimum you should know how to tie the basic constrictor knot and the double constrictor knot. You may have seen other "How to" instructions or videos which recommend tying the knot with a short piece of cord and then tightening it with two pairs of pliers. We recommend anchoring one end of the constrictor cord to something solid, like a door hinge pin or a cleat on your boat. This will make it much easier to tie and tighten your knot by giving you something solid to pull against while freeing one hand to manipulate the rubber tubing. If you are real particular about how your bands look, and you don't want to cover the knot with Spearit® low temperature PVC shrink rings, we will cover how to tie a final constrictor knot over the first so that the ends can be trimmed flush and neat with no worries.
Note to Melters: If you are really into the ritual of melting the ends of your constrictor, and you are wondering why anyone would want to waste an excuse to whip out the lighter and melt some plastic, here's why:
- No Melting Required - No knot creep removes any rational reason to melt little balls in the end of your constrictor cord and flush cut ends don't fray.
- Kevlar® Doesn't Melt - Kevlar® is very tolerant of heat up to about 800 deg. Fahrenheit-ish. If you are persistent enough to get it that hot you will be disappointed as it skips the melting thing and goes straight to carbonizing (charring)
- All is not lost for Melters - If you are wondering if all of the good reasons to use Spearit Kevlar® constrictor outweigh the joy of melting Nylon, you may find some solace in knowing that our awesome but slippery Spectra® wishbone cord/shooting line will require some melting to prevent simple terminal knots from creeping right off the end.
|
Part 1 How to tie a basic constrictor knot
|
|
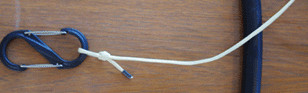
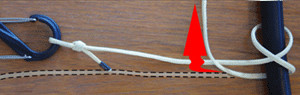
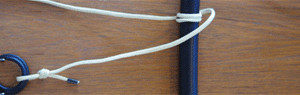
1. Start by crossing the cord over the
tubing at an angle.
|
|
|
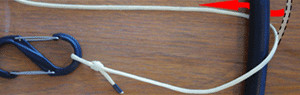
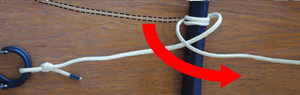
2. Loop the tail back under the tubing.
|
|
|
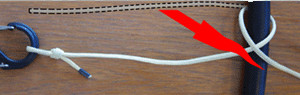
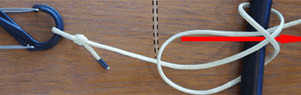
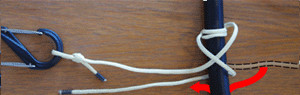
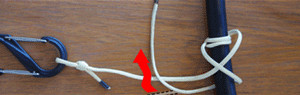
3. Loop the tail over the tubing forming an X.
|
|
|
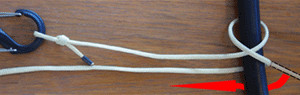
4. Loop the tail back under the tubing.
|
|
|
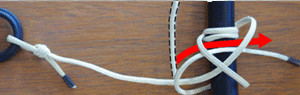
5. Cross the tail over the anchored end of the cord.
|
|
|
6. Thread the tail under the X and over the tubing.
|
|
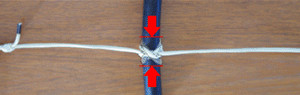
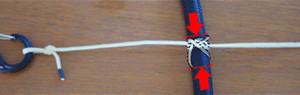
7. Snug the knot by gently pulling the tail while pushing
the loops on the back side together.
|
|
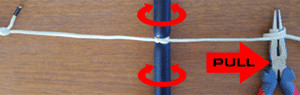
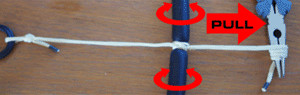
8. Grasp the tail with a pair of pliers and pull the knot
tight while rolling the tubing back and forth to insure
that the loops tighten evenly.
|
|
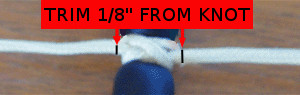
9. If you plan on covering the knot with a shrink ring or
you are relaxed enough not to sweat some short
loose ends, trim the excess
cord about 1/8in(3mm)
from the knot and your done. If on the other hand,
knot aesthetics are important to you, but you are
opposed to shrink rings, continue on.
|
|
10. Flip the band over by rolling it one half turn towards
anchor.
|
|
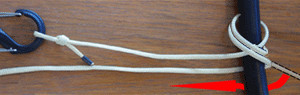
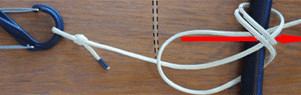
11. Loop the tail over the anchored end of the cord
forming an X.
|
|
|
12. Loop the tail back under the tubing.
|
|
|
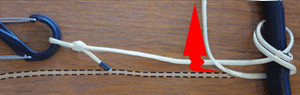
13. Cross the tail over the anchored end of the cord.
|
|
|
14. Thread the tail under the X and over the tubing.
|
|
15. Snug the knot by gently pulling the tail while pushing
the loops together.
|
|
16. Grasp the tail with a pair of pliers and pull the knot
tight while rolling the tubing back and forth to insure
that the loops tighten evenly.
|
|
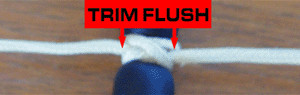
17. Trim the excess cord flush using a razor blade or
sharp knife.
There you have it, neat and complete.
|
|
|
Part 2 How to tie a double constrictor knot
|
|
1. Start by crossing the cord over the
tubing at an angle.
|
|
|
2. Loop the tail back under the tubing.
|
|
3. (Here's the double part) Loop the tail around the
tubing twice forming an X.
|
>

|
4. Loop the tail back under the tubing.
If you are tying a
double constrictor skip to step 5D.
|
>
|
|
5. Cross the tail over the anchored end of the cord.
|
>
|
|
6. Thread the tail under the X and over the tubing.
|
>
|
7. Snug the knot by gently pulling the tail while pushing
the loops on the back side together.
|
|
8. Grasp the tail with a pair of pliers and pull the knot
tight while rolling the tubing back and forth to insure
that the loops tighten evenly.
|
|
9. If you plan on covering the knot with a shrink ring or
you are relaxed enough not to sweat some short
loose ends, trim the excess
cord about 1/8in(3mm)
from the knot and your done. If on the other hand,
knot aesthetics are your important to you, but you are
opposed to shrink rings continue on.
|
|
10. Flip the band over by rolling it one half turn towards
anchor.
|
|
11. Loop the tail over the anchored end of the cord
forming an X.
|
|
|
12. Loop the tail back under the tubing.
|
|
|
13. Cross the tail over the anchored end of the cord.
|
|
|
14. Thread the tail under the X and over the tubing.
|
|
15. Snug the knot by gently pulling the tail while pushing
the loops together.
|
|
16. Grasp the tail with a pair of pliers and pull the knot
tight while rolling the tubing back and forth to insure that
the loops tighten evenly.
|
|
17. Trim the excess cord flush using a razor blade or
sharp knife.
There you have it, neat and complete.
|
|
|
